Why Is Your Laser Printer Leaving Spots on Paper?
A laser printer leaving spots on paper usually has toner contamination, a dirty roller, or a worn drum. The spot pattern helps you identify the part before you clean or replace anything.
On this page (9 sections)
- What causes a laser printer to leave spots on paper?
- How can you trace the repeating spot pattern?
- Could the toner cartridge be causing the spots?
- How do you check the drum without damaging it?
- When is the transfer roller the likely cause?
- Can the fuser create spots or smears?
- Which printer features help you troubleshoot spots?
- What should you do if the spots do not go away?
- How do you prevent laser printer spots on paper?
A laser printer leaving spots on paper usually has loose toner, a dirty roller, toner contamination, or a damaged drum. The shape, color, and spacing of the spots can help you narrow down the cause before buying a replacement part.
Start with a few blank pages and the printer's internal test page. Don't rub the printed area or reach into a warm printer, because toner and fuser parts can remain hot after printing.
What causes a laser printer to leave spots on paper?
The most common causes are toner contamination, a dirty paper path, a damaged drum, and a fuser problem. Each issue tends to create a different pattern.
Loose toner often appears as small black specks that vary from page to page. A dirty roller can create marks that repeat in the same position, while a scratched drum may leave repeated dots, lines, or shaded areas.
The fuser bonds toner to the paper with heat and pressure. If toner is not fixed correctly, marks may smear when you touch them.
How Does a Laser Printer Fuse Toner to Paper? explains why this part matters.
Paper can also contribute to spots. Damp, dusty, curled, or poorly stored sheets can carry debris through the machine or prevent toner from moving cleanly.
Read Do Laser Printers Need Special Paper? In Plain Terms before changing paper types.
How can you trace the repeating spot pattern?
Print several pages and measure the distance between matching spots. A repeated distance usually means the same area of a rotating drum, roller, or fuser returns to the paper path.
Use a ruler to compare the centers of repeated marks. Record whether the spots are black, gray, pale, smeared, or raised.
This simple record can help you describe the fault to a repair shop or match it to the printer manual.
A single random spot may be loose toner or paper dust. Marks that appear at the same vertical position on every page are more likely tied to a cartridge, drum, transfer roller, or fuser.
If the marks change after removing and reseating the cartridge, check for loose toner around the cartridge edges. Keep the cartridge level and avoid shaking it unless the printer's instructions specifically tell you to do so.
Could the toner cartridge be causing the spots?
Yes. A leaking, damaged, or poorly seated toner cartridge can spread spots across the page.
Toner may collect on the cartridge surface or transfer into areas where it does not belong.
Turn the printer off and let it cool before opening the access door. Remove the cartridge as the manual directs, then look for loose powder, cracked plastic, or toner around the edges.
Do not use a household vacuum unless the manufacturer approves it for toner.
Reinstall the cartridge firmly and print a test page. If the spots remain at the same intervals, the cartridge may not be the only cause.
Can another printer help with special paper?
An inkjet-only paper product won't solve toner spots in a laser printer. The Tatu-Derm Inkjet Stencils Tracing Paper is a ream of 500 sheets designed for inkjet stencils, with 8.5 x 11 in paper dimensions and a tracing finish.
Choose paper for the printer technology and task. Using a sheet made for inkjet printing in a laser printer can create feeding or heat problems, so follow the paper guidance in your printer manual.
How do you check the drum without damaging it?
Inspect the drum only as far as the manual allows, and never touch or scratch its surface. A drum defect can repeat the same spot or mark each time the damaged section reaches the paper.
Some printers use a drum built into the toner cartridge. Others use a separate drum unit.
That difference affects whether a cartridge replacement can solve the issue or whether a separate part needs attention.
Use a bright light to look for obvious toner buildup or scratches, but don't scrape the drum. Finger oils and pressure can affect the surface, and household cleaners may damage its coating.
A drum may also leave a repeating gray band or a series of evenly spaced dots. If the pattern remains after a correctly installed replacement cartridge, follow the printer's drum or imaging-unit service instructions.
For broader troubleshooting, see How to Fix Laser Printer Print Quality Problems. It covers faded output, streaks, uneven density, and other defects that can appear with spots.
When is the transfer roller the likely cause?
A transfer roller becomes more likely when spots repeat but the toner cartridge looks clean. This part moves toner from the imaging surface toward the paper, so contamination can create marks in a fixed pattern.
Don't touch the transfer roller with bare fingers. Oils can affect the contact between the roller and the paper.
Use only the cleaning method named in the manual, and don't press on the roller while removing paper.
If the printer has a removable transfer unit, check its installation and any visible toner buildup. If the part is not user-serviceable, stop after the basic checks and arrange service.
A printer with alignment problems can also make output look uneven, but alignment usually changes the position of text or images rather than creating repeated black spots. For that issue, see How to Fix Brother Laser Printer Alignment Problems.
Can the fuser create spots or smears?
Yes. A dirty or damaged fuser can leave toner marks that smear, repeat, or fail to bond to the paper.
The fuser is hot, so give the printer time to cool before inspecting the paper path.
Print a test page, let it cool, and gently touch an affected area. If toner lifts or smears easily, the fuser may not be applying the right heat or pressure.
Do not touch the fuser rollers directly.
Paper that is too heavy, coated, damp, or unsuitable for the printer can also affect fusing. Use a supported paper type and the correct driver setting.
Some printers show a fuser error or maintenance message. Treat that warning seriously and use the manual's service steps rather than forcing the part open.
Which printer features help you troubleshoot spots?
A printer with copying and scanning can help you compare a copied page with a computer print job. If both outputs show the same marks, the printer's print path is more likely involved than the computer file.
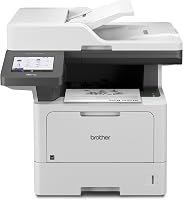
The Brother Professional Laser Printer All-in-One with Scanner has monochrome printing, copying, scanning, wireless networking, Ethernet, USB, and automatic 2-sided printing. It prints up to 50 pages per minute and supports media up to 8.5 x 14 in.
Its 70-page automatic document feeder supports multi-page scanning, while the separate document glass supports documents up to legal size. Those functions help with workflow, but they don't prevent toner, drum, roller, or fuser wear.
A smaller all-in-one can suit a lighter print area. The HP Laserjet MFP M140w Wireless Black & White Printer prints, scans, and copies, with print speeds up to 21 black-and-white pages per minute.
The HP model supports wireless printing from mobile devices, PCs, and tablets, plus USB 2.0. It has no automatic duplex printing, so choose it with that limitation in mind.
What should you do if the spots do not go away?
Replace the likely source only after confirming the pattern and checking the manual. Start with the cartridge, then consider the drum, transfer roller, or fuser based on the repeated spacing and whether toner smears.
Keep a record of which pages show the marks. Save one clean example and one affected example if you need support.
Include the paper type, print setting, and whether the spots repeat at the same distance.
Don't keep printing if loose toner is spreading heavily, paper is catching in the fuser, or the printer shows a heat or service warning. Continuing can spread toner to other components.
If the page is too pale rather than spotted, see Why Is My Laser Printer Not Printing Dark Enough?. For a wider list of symptoms, start with common problems with printers.
How do you prevent laser printer spots on paper?
Store paper flat and dry, keep the printer clean according to its manual, and replace worn consumables before they damage the print path. Avoid touching drums and rollers during routine cartridge changes.
Use paper that matches the printer's supported sizes and media settings. Remove scraps carefully, keep the access area free of dust, and let hot parts cool before inspection.
The decision rule is simple: random specks suggest loose toner or debris, fixed repeating spots suggest a rotating component, and smearing suggests a fuser or paper-setting problem. Trace the pattern first, then clean or replace only the part that fits the evidence.
Frequently asked questions
Why is my laser printer leaving black spots on paper?
Black spots usually come from loose toner, a dirty transfer area, a damaged drum, or a contaminated roller. Print several blank pages and compare the spot pattern.
Repeated marks at fixed intervals often point to a rotating part, while random specks are more likely loose toner or paper debris.
Why do laser printer spots repeat down the page?
Repeating spots usually mean one rotating printer component has a defect or contamination. The drum, developer roller, transfer roller, or fuser can leave marks each time the same section turns through the print path.
Measure the distance between spots and consult the printer's service guidance.
Can I clean a laser printer drum?
Only clean the drum if the printer manual gives a safe method. Avoid touching the drum surface, scraping it, or using household cleaners.
Many drums are part of the toner cartridge, while others are separate units, so the correct repair depends on the printer design.
Why are spots still appearing after changing toner?
Spots can continue after a toner change when the drum, transfer roller, fuser, or paper path is dirty or damaged. Check whether the new cartridge is seated correctly, then print an internal test page.
If the same marks remain in the same places, the cartridge may not be the source.