How to Choose a Large Format Photo Scanner
Choose a large format photo scanner by matching its scan area to your biggest photos, then compare optical resolution, feeding style and handling needs. The products below show useful options for oversized photos, standard prints and document workflows.
On this page (8 sections)
- What makes a large format photo scanner suitable?
- How much optical resolution do old photos need?
- Which handling style fits your photo collection?
- Which features help with an archive of old photos?
- Which scanners fit different photo and document workflows?
- How should you prepare oversized photos for scanning?
- How should you choose scan settings and file types?
- What should you check before buying a large format photo scanner?
A large format photo scanner should match your largest photo dimensions first, then your needed optical detail and handling method. Oversized originals may need a wide flatbed or specialty scanner, while standard prints can work better with a faster photo feeder or compact flatbed.
Measure the photos you plan to digitize, including borders and curled edges. A scanner that handles only common print sizes will not solve an oversized photo project, even if its resolution looks impressive.
Lay each original flat on a table and record the width and height with a ruler. Do this for every group in the collection, because one oversized print can change the scanner you need.
Note whether any photos are mounted, thick, curled, brittle or backed with notes. Those details affect handling as much as size, since some originals should not pass through rollers.
Separate standard prints from panoramas, postcards and any items beyond common sizes. This sorting shows whether a home scanner fits most of the work or only part of it.
Think about how you will use the digital files after scanning. Sharing, printing and long term archiving each place different demands on detail, file size and organization.
Consider the space where the scanner will sit and how it will connect. A feeder may need room for input and output, while a flatbed needs a stable surface and room to open the lid.
Plan how you will name, sort and back up files before you begin. A clear system saves time when a collection contains hundreds of similar prints.
If your originals are documents rather than photographs, start with our digital scanner for documents guide. It covers feeding, OCR and multi-page workflows that may matter more than photo detail.
That guide suits receipts, letters and forms where searchable text matters most. A photo scanner remains the better starting point when image quality and original care come first.
Read the product pages after you have measured your collection. Compare the stated scan or feed size against your largest item, not against the average print.
Check the handling style for each model and decide whether flatbed placement or feeding suits your originals. This step prevents buying a fast scanner that cannot safely handle the photos you value most.
Also check the software and file options for your planned workflow. Sharing copies, archival masters and enlargements may need different settings from the same device.
Set aside a small group for a first test once you choose a model. A short test reveals cropping, orientation and file size issues before you process the full archive.
What makes a large format photo scanner suitable?
A suitable large format photo scanner gives you enough physical scan area, useful optical resolution and a safe way to position the original. These three factors matter more than a large maximum number printed in a specification list.
Check these points before comparing models:
| What to compare | Why it matters |
|---|---|
| Scan area or feed size | Confirms the entire photo can be captured |
| Optical resolution | Controls how much real image detail is recorded |
| Flatbed or sheet-fed design | Affects safety, speed and original handling |
| Color depth | Helps preserve subtle color changes |
| Software | Determines correction, OCR, file saving and organization |
| Connection | Affects placement and setup |
| Batch capacity | Matters when scanning many similar photos |
| Document support | Helps if one scanner must handle both photos and paperwork |
A flatbed gives you a fixed glass surface and is often easier to use with fragile originals. A sheet-fed design can be much faster, but you should avoid feeding originals that are brittle, heavily curled or unsuitable for rollers.
For genuinely oversized work, compare the models in our best large format scanner guide. The useful question is not simply which scanner has the highest resolution.
It is which scanner can capture your largest original without cropping or unsafe handling.
How large are the photos you need to scan?
Start with the largest physical photo, not the average one. Include panoramic prints, mounted photos, postcards, school pictures and any border that must remain in the digital file.
Lay several originals flat and record their dimensions. If they vary widely, separate them into groups.
One scanner may suit standard prints, while a larger flatbed or specialty service may be needed for the largest group.
A 36-inch original is a different project from an 8 x 10 in print. If your work includes very wide photographs, read how to choose a 36-inch large format scanner before looking at home photo scanners.
How much optical resolution do old photos need?
Choose 300 dpi for convenient sharing, 600 dpi for detailed archiving and higher settings when you need enlargement or heavy cropping. Optical resolution matters more than an inflated software-enhanced number.
Use 300 dpi when the goal is a family slideshow, quick sharing or a manageable copy. Choose 600 dpi when you want to preserve more detail for future editing or printing.
Higher resolution can help when the original is small and you plan to enlarge it. It also creates larger files, so set a consistent file naming and storage method before scanning a large collection.
Color depth is another useful comparison. A deeper color specification may preserve more tonal information, but the final result still depends on the original, the scanner imaging system and the software settings.
Which handling style fits your photo collection?
Choose a flatbed for fragile, thick or unusual originals and a sheet-fed photo scanner for speed with compatible loose prints. Handling style determines how quickly you can work and how much risk you place on the originals.
A flatbed requires you to place each photo on the glass, close the lid and start the scan. That takes longer per item, but it gives you control over alignment and avoids sending the photo through a feed path.
A feeder can process many loose prints in a session. Look for a carrier sheet or other protection when scanning delicate photos, and keep dust off both the original and the scanning surface.
Do not assume a document scanner is a photo scanner just because it can capture color. A document-focused model may be excellent for receipts, cards and searchable files while being less suitable for a large or fragile photograph.
Which features help with an archive of old photos?
The most helpful features are batch handling, color correction, dust reduction and flexible file resolution. These reduce repetitive work when you have many similar prints.
Batch handling suits loose prints of similar size and condition. It lets you load a group, start the process and review the results together instead of treating each photo as a separate task.
Color correction can help faded prints look more balanced for sharing. It does not replace the original, so keep the unedited scan available when you want an archival copy.
Dust reduction helps when prints have picked up marks during storage. Light dusting before scanning still matters, because software works best on a clean original and a clean scan surface.
Rotation and cropping reduce manual editing after the scan. They are especially useful when prints were stored at different angles or when borders should be trimmed for a slideshow.
Flexible file resolution lets you match the scan to its purpose. A sharing copy can stay smaller, while an archival file can keep more detail for later editing or printing.
Duplex scanning can also matter when photographs have handwritten notes on the back. It captures the front and back in one pass, which keeps the image and its context together.
A carrier sheet can help protect suitable originals during feeding. It does not make every damaged or fragile photo safe to feed, so inspect the photo before starting a batch.
Test a few photos before loading a full batch. Check focus, color, cropping and file naming, then adjust the load order if mixed sizes cause problems.
Clean the scanner and the photos gently between groups. Store archival files and sharing copies in separate folders so the detailed master stays safe.
Which scanners fit different photo and document workflows?
The best choice depends on whether you value photo batch speed, portability or flatbed image detail. These 3 products cover different jobs, and none should be treated as a universal oversized-photo solution.
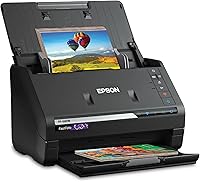
Epson FastFoto FF-680W High-Speed Duplex Photo
The Epson FastFoto FF-680W High-Speed Duplex Photo is designed for people who need to digitize many photos rather than place every print on a flatbed one at a time. It can batch-scan up to 36 photos and scan photos as quickly as 1 photo per second at 300 dpi, according to Epson's stated capabilities.
It handles Polaroid photos, panoramas, postcards and photos up to 8 x 10 in. That makes it useful for common family-photo archives, but it is not a solution for photographs larger than its supported size.
Its workflow includes 300 dpi sharing, 600 dpi TIFF archiving and 1200 dpi enlargement settings. Auto enhancement, color restoration, red-eye reduction, de-skew, crop and rotate can reduce repetitive editing.
Duplex scanning captures the image and handwritten notes on the back in one scan. The carrier sheet and microfiber cloth support careful preparation, while Wi-Fi and USB provide connection choices.
Choose this model when your collection is mostly loose prints up to 8 x 10 in and speed matters. Look elsewhere when your main originals are genuinely oversized or require a flat, open scan surface.
Epson Workforce ES-50 Compact & Lightweight Mobile
The Epson Workforce ES-50 Compact & Lightweight Mobile is better suited to documents than a large format photo archive. It scans one sheet at a time, handles documents up to 8.5 x 72 in, and can digitize receipts and ID cards.
Its compact size and 9.44 oz weight suit a mobile workflow. USB power means it operates through a computer connection without batteries or an external power supply.
Epson ScanSmart software supports reviewing and saving files, while included Nuance OCR can create searchable PDFs and editable Word and Excel files. Automatic feeding mode combines multi-page scans into one file as each sheet is inserted.
The ES-50 can make sense when your photo project includes long documents or when you need a portable scanner for paperwork. It is not the right pick for oversized photographs, batch photo scanning or flatbed handling.
Choose it when portability and document capture are your main needs. For a combined printing and scanning setup, compare the options in our best large format printer scanner guide.
Canon CanoScan LiDE 400 Slim Scanner
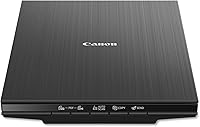
The Canon CanoScan LiDE 400 Slim Scanner suits buyers who want a flatbed surface for individual photos and documents. It has a 4800 x 4800 dpi resolution and supports paper sizes up to 8.50 x 11.69 in.
Its flatbed design gives you control over placement, which can help with photos that should not pass through a feeder. Canon also includes color restore and dust removal features for image work.
Scanning can take as fast as 8 seconds, and the 5 built-in EZ Buttons provide direct controls. Auto scan mode detects what you are scanning, while PDF buttons support multi-page PDF files that are editable and searchable.
The included USB Type-C cable carries both data and power. A vertical stand is included, which can help when desk space is limited, but you should confirm that the upright position suits the originals you need to scan.
Choose this model for detailed flatbed scans of standard-size photos and documents. It is not large enough for photos beyond its supported paper sizes, so measure oversized originals before choosing it.
For A3-size comparisons, see our best A3 flatbed scanner guide.
How should you prepare oversized photos for scanning?
Prepare oversized photos by cleaning the scan surface, measuring the original and planning several captures only when the photo cannot fit in one scan. Keep the original flat and avoid forcing it through a feeder.
Dust the glass and the photo gently with suitable materials. Keep liquids away from the scanner, and follow the device's care instructions for cleaning.
If the photo is larger than the scan area, do not assume that stitching multiple scans will be simple. You must keep the camera angle, scale and overlap consistent, then check the joined image for seams and alignment errors.
For valuable, fragile or mounted originals, a specialty scanning service may be safer than repeated handling. A home scanner is most useful when its scan area and handling method match the material you already have.
How should you choose scan settings and file types?
Choose settings based on the final use of each file. A sharing copy, an archival master and an enlargement may need different resolution and file formats.
Use a lower-resolution copy for quick sharing when storage space matters. Keep a higher-resolution archival file when you may crop, restore or print the image later.
Use a consistent folder structure with the original date, people or event when known. Save the scan with a clear file name, then create a second copy on separate storage.
Scan a small sample before processing hundreds of photos. Check cropping, color, dust, orientation and file size, then keep the settings that fit the rest of the batch.
If you also need a general document machine, compare best document scanner on sale options after you define the photo workflow. A document-focused choice may be better value when photos are only an occasional task.
What should you check before buying a large format photo scanner?
Check these points before you choose:
- Measure the largest photo, including the area you want to keep.
- Confirm the scanner's actual scan area or maximum feed size.
- Choose flatbed handling for fragile, thick or unusual originals.
- Choose feeding speed when you have many compatible loose prints.
- Match optical resolution to sharing, archiving or enlargement.
- Check whether the software supports correction, cropping, OCR or file organization.
- Confirm the connection type and available desk space.
- Plan storage for large files and backup copies.
- Test a small sample before scanning the complete archive.
- Use a specialty service when the original is too large or delicate for the scanner.
The Epson FastFoto FF-680W High-Speed Duplex Photo is the strongest fit here for a large batch of compatible photos up to 8 x 10 in. The Canon CanoScan LiDE 400 Slim Scanner is the better fit for detailed flatbed scans of standard-size originals, while the Epson Workforce ES-50 Compact & Lightweight Mobile fits portable document work.
For a large format photo scanner, choose by physical scan area before resolution. Pick a specialty wide scanner or service for genuinely oversized photos, the Epson FastFoto for compatible batch photo work, and the Canon flatbed for detailed single-photo scans within its supported size.
Frequently asked questions
What should I check first in a large format photo scanner?
Check the scanner's maximum scan or feed size first, because a high resolution cannot help if your photo is too large for the scanning area. Then compare optical resolution, flatbed or sheet-fed handling, photo protection features, connection type and the file formats you need for archiving or sharing.
Is a flatbed scanner better for oversized photos?
A flatbed scanner is usually the safer choice for delicate, thick, curled or oddly shaped photos because you place the original on glass instead of feeding it through rollers. Confirm the flatbed's actual scan area before buying, since many home models handle letter or A3 media rather than genuinely oversized photographs.
What resolution is best for scanning old photos?
Use about 300 dpi for everyday sharing, 600 dpi for detailed archiving and more when you plan to enlarge a small original. Higher resolution creates larger files, so choose it for a clear purpose such as restoration, cropping or enlargement rather than using the highest setting for every scan.
Can a photo scanner scan documents too?
Many photo scanners can handle documents, but their feeding style and software determine how useful that is. A duplex model can capture both sides in one pass, while a flatbed handles one item at a time.
Check paper length, batch capacity, OCR and the connection method before relying on one device for both jobs.
What is the difference between a large format photo scanner and a document scanner?
A large format photo scanner prioritizes the physical scan area and image detail needed for oversized originals. A document scanner often prioritizes speed, automatic feeding, OCR and multi-page files.
Some devices cover both jobs, but you should choose based on the largest original and the workflow you use most.