How to Use a Scanner on Mac
To use a scanner on Mac, connect it by USB or Wi-Fi, open Image Capture or the scanner software, choose your settings, and click Scan. Save the result as a PDF or image in a folder you can find again.
On this page (10 sections)
- How do you connect a scanner to a Mac?
- How do you scan with Image Capture on Mac?
- Which scan settings should you choose?
- How do you save a scan as a PDF?
- How do you scan photos on a Mac?
- How do you scan a book or thick document?
- How do you use a document feeder on Mac?
- What should you do if a Mac scanner is not working?
- How do you care for a scanner?
- What is the simplest way to use a scanner on Mac?
To use a scanner on Mac, connect it by USB or Wi-Fi, open Image Capture or the scanner software, choose your scan settings, and save the result as a PDF or image. The exact buttons vary by scanner, but the workflow is similar across macOS.
Before you begin, remove dust from the glass, place the page squarely, and check that the scanner has power. If you are choosing equipment, our guide to a digital scanner for documents explains the main scanner types and workflows.
How do you connect a scanner to a Mac?
Connect the scanner with its USB cable or join it to the same Wi-Fi network as your Mac. A USB connection is usually the simplest first setup, while Wi-Fi lets you place a supported scanner farther from the computer.
Turn on the scanner before opening the scanning app. For Wi-Fi models, complete the scanner's network setup first and confirm that the Mac is using the same network.
Open System Settings, choose Printers & Scanners, and look for the scanner. If it appears, select it and open the scanner interface.
If it does not appear, check the cable, power, network, and any software required by the brand.
Apple's guide to scanning images or documents on Mac covers the current macOS steps and available scan controls.
How do you scan with Image Capture on Mac?
Image Capture is a useful built-in option when macOS recognizes your scanner. It lets you choose the source, resolution, file format, destination folder, and other basic settings.
- Open Image Capture from Applications.
- Select your scanner in the left sidebar.
- Choose the glass or document feeder as the source.
- Set the scan area, resolution, format, and destination.
- Click Scan and wait for the file to finish saving.
- Open the saved file and check its pages, direction, and readability.
Use the flatbed or glass source for books, photos, fragile pages, and items that cannot pass through a feeder. Use a document feeder for loose pages when your scanner supports one.
If the scan preview is crooked, adjust the page and scan area before saving. A straight page and a tight crop usually produce a cleaner file than correcting a large empty border afterward.
Which scan settings should you choose?
Choose 300 dpi for most documents, 600 dpi for detailed photos, and PDF for multipage records. Higher resolution creates larger files, so match the setting to how you will use the scan.
Use these starting points:
- Documents: 300 dpi, grayscale or color, PDF.
- Receipts: 300 dpi, grayscale or color, PDF or JPEG.
- Text for OCR: 300 dpi, clear contrast, PDF with searchable text if supported.
- Photos: 600 dpi when you want more image detail, JPEG or TIFF.
- Line drawings: 300 to 600 dpi, grayscale or color.
Color is useful when stamps, highlights, signatures, or photographs matter. Grayscale can make ordinary text files smaller and easier to manage.
Set the scan area to the page size when possible. A custom area helps reduce blank space around small receipts, cards, and photographs.
How do you save a scan as a PDF?
Choose PDF as the file format, select a folder, name the file clearly, and confirm that the saved document opens. For a multipage file, enable the option to combine pages before starting or use the software's add-page control.
A useful filename includes the subject and date, such as insurance-form-2026-10-20.pdf. Keep related files in a named folder instead of leaving them in Downloads.
If the PDF contains text, use OCR when your scanner software supports it. OCR can make a scanned document searchable, but always check names, numbers, and dates because recognition can make mistakes.
Which scanner helps with searchable documents?
The Epson Workforce ES-50 suits Mac users who want a compact, single-sheet document scanner. It scans a single page in as quickly as 5.5 seconds, connects through USB, works with Mac, and includes Epson ScanSmart software with Nuance OCR.
It handles documents up to 8.5 x 72 in and has a standard sheet capacity of 1. Its automatic feeding mode can combine multi-page scans into one file as you insert each sheet.
Choose it when portability and a small footprint matter. Its single-sheet design is less suited to scanning a large stack without feeding pages one at a time.
How do you scan photos on a Mac?
Use the flatbed glass for photos that need careful placement, or use a photo scanner with batch handling for many loose prints. Clean the glass with an appropriate soft cloth and keep photographs free of dust before scanning.
Place the photo face down and align it with the guide marks. Use a preview to check the crop, then choose a higher resolution when you may enlarge or restore the image later.
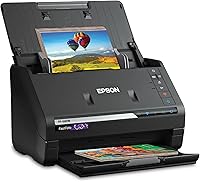
The Epson FastFoto FF-680W High-Speed Duplex Photo and Document Scanner is designed for large photo collections and mixed photo-document work. It can batch-scan up to 36 photos, scan photos up to 8 x 10 in, and capture both sides of a photo in one scan.
It offers 300 dpi sharing, 600 dpi TIFF archiving, and 1200 dpi enlargements. Epson FastFoto also includes auto enhancement, color restoration, red-eye reduction, de-skew, crop, and rotate tools, plus Epson ScanSmart software with OCR.
Choose it when you have many photographs or want photo and document scanning in one device. Its 11.7 x 11.7 x 6.9 in size and 8.2 lb weight make it a less portable choice than a mobile scanner.
How do you scan a book or thick document?
Use a flatbed scanner when the page cannot feed through a document scanner. Lift the lid, place the page face down on the glass, align it carefully, and lower the lid without shifting the page.
The Canon CanoScan LiDE 400 Slim Scanner, 7.7" x 14.5" x 0.4", Document & Photo Scanner, Black suits Mac users who scan books, photos, and individual pages on a flatbed. It has 4800 x 4800 dpi resolution, USB connectivity, and built-in PDF buttons for multipage PDF files.
Its auto scan mode detects what you are scanning, and image tools include color restore and dust removal. The scanner includes a vertical stand and a USB Type-C cable that handles data and power.
Choose it when photo detail and flatbed placement matter more than automatic page feeding. A flatbed workflow takes longer for a large stack because each page must be placed on the glass.
How do you use a document feeder on Mac?
Load pages in the feeder with the printed side facing the direction shown by the scanner, then select the feeder as the source. Remove staples, clips, folded corners, and damaged pages before scanning.
Keep pages in order and use the software's multipage or automatic feeding mode. Scan a short group first to confirm orientation, page size, and file settings.
For double-sided pages, choose duplex scanning if the scanner supports it. Our explanation of what duplex scanning on a printer is shows how both sides can be captured in one workflow.
Readers comparing document scanners may also want our guide to the best document scanner for PC, especially when the same scanner will be shared with a Windows computer.
What should you do if a Mac scanner is not working?
Check the connection first, then restart the scanner and Mac, and confirm that the correct scanner appears in System Settings. Many connection problems come from power, cables, network setup, or outdated software.
Try these checks:
- Reconnect the USB cable directly to the Mac if possible.
- Confirm the scanner is powered on and not showing an error.
- For Wi-Fi, place the Mac and scanner on the same network.
- Close other scanning apps before trying again.
- Remove and add the scanner again in Printers & Scanners.
- Download current software from the scanner brand when needed.
If the scanner appears but produces blank pages, check the source selection and page placement. If text looks blurry, clean the glass and raise the resolution for the next scan.
For brand-specific steps, see our guide to how to use a Canon document scanner. If you are still comparing devices, review the best scanner for Mac and best document scanner for Mac guides.
How do you care for a scanner?
Keep the glass clean, feed only smooth pages, and store saved scans in organized folders. Careful handling reduces streaks, paper jams, and repeated scans.
Use a soft, lint-free cloth for the glass and follow the scanner's care instructions for rollers or maintenance sheets. Do not force a page through a feeder, especially when it is folded, torn, damp, or attached to a clip.
Back up important PDFs and photos to a second location. If you scan irreplaceable photographs, keep the original prints after creating and checking the digital copies.
A wireless model can suit flexible placement, so compare options in our guide to the best wireless document scanner. For glass-based scanning, learn more about what a flatbed scanner on a printer is.
What is the simplest way to use a scanner on Mac?
Connect the scanner, select it in Image Capture or its software, choose 300 dpi and PDF for ordinary documents, scan, and verify the saved file. Use 600 dpi or higher for detailed photos, and enable OCR when you need searchable text.
Choose the Epson ES-50 for compact single-sheet documents, the Epson FF-680W for batch photo and document work, or the Canon LiDE 400 for flatbed photos and individual pages. Your best choice depends on page volume, photo needs, portability, and whether you need a feeder.
Frequently asked questions
Can you scan documents on a Mac without software?
Yes. macOS can scan through Image Capture or Printers & Scanners in System Settings when the scanner is recognized. Some scanners also include software for OCR, automatic feeding, file review, cloud storage, or photo enhancement, so use the included software when you need those features.
Why is my scanner not showing up on my Mac?
Check the USB cable, power, Wi-Fi connection, and scanner status first. Then open System Settings, choose Printers & Scanners, and add the scanner if it is missing.
Restarting the scanner and Mac can help, while older models may need current software or drivers from the manufacturer.
What format should I use for scanned documents on Mac?
Use PDF for multipage documents, forms, receipts, and records that you may search or share. Use JPEG for photos and simple images.
Choose TIFF when you want a larger archival image and the scanner software supports it.
How do I scan multiple pages into one PDF on a Mac?
Place the first page on the scanner or in its feeder, enable the setting for combining scans or creating a multipage document, and continue feeding pages as prompted. Save only after the final page is scanned, then open the PDF to confirm the pages are in the right order.