How to Use an ADF Photo Scanner
Use an ADF photo scanner for clean, flat prints that its maker says it can handle. Sort by size, remove clips and loose debris, follow the scanner's loading direction, and feed a small batch first to check for jams, skew, or damage.
On this page (6 sections)
To use an ADF photo scanner, sort clean, flat prints into compatible batches, load them in the direction shown by the scanner, and scan a small test group first. Check the results and the prints before continuing, and use a carrier sheet or flatbed for photos that may be damaged by feeding.
An automatic document feeder can save time on a suitable batch, but it moves prints through rollers. Check the scanner maker's photo guidance before loading old, curled, cracked, taped, or unusually thick pictures.
How do you prepare photos for an ADF scanner?
Prepare compatible photos by sorting them, removing loose debris, and checking their condition. Keep prints with different sizes or delicate surfaces in separate groups so you can follow the scanner's instructions for each batch.
Wash and dry your hands before handling prints. Hold photos by the edges, and remove paper clips, sticky notes, dust, and anything else that could catch in the feeder.
Don't force curled, cracked, peeling, or stuck photos into an ADF. Use a flatbed or ask a photo conservator about fragile originals.
Can an ADF photo scanner handle every print size?
No. Check the scanner's supported photo sizes and media guidance before loading prints, including panoramic, square, or oversized pictures.
For a digital scanner for documents and photos, compare the feeder's handling guidance with your print sizes and how often you'll scan. A photo-specific overview of best scanners for photos, slides, and negatives can help if you also need to digitize film or other media.
How should you load a photo batch?
Load the photos in the direction and orientation shown in the scanner's instructions. Keep the edges aligned, avoid overfilling the feeder, and make sure no print is folded or overlapping.
Start with a few prints of similar size. If they feed straight and emerge without marks, continue with a batch within the scanner's stated limit.
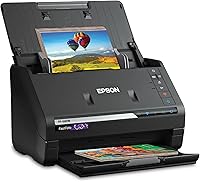
A photo feeder with a stated batch capacity can suit larger jobs. Epson says the FastFoto FF-680W can batch-scan up to 36 photos, handle multiple sizes in one batch, and includes a carrier sheet for delicate photos.
Epson also describes single-step scanning that captures both the image and handwritten notes on the back. Use the carrier sheet and follow the scanner's instructions when handling prints that need extra care.
What scan settings should you choose?
Choose a resolution and file format based on how you'll use the scans. A lower resolution can suit sharing, while a higher-resolution format can be useful for archiving or enlarging when the scanner supports it.
Epson lists 300 dpi for sharing, 600 dpi TIFF for archiving, and 1200 dpi for enlargements on the FastFoto FF-680W. These are the scanner's format options; choose settings for your own needs and storage space.
Use color scanning for color prints, then save files in a folder structure that makes them easy to find. Add a date, event, or family name to filenames after checking that the scan is clear.
How can you scan photos without scratching them?
Keep the feeder path and photos free of loose grit, and don't feed damaged prints. Even small particles can leave marks when a photo passes through rollers.
Use the scanner's cleaning instructions and any included cloth as directed. Epson includes a microfiber cloth with the FastFoto FF-680W for lightly dusting photos.
The Epson WorkForce ES-50 is described as a single-sheet-fed document scanner for paper, receipts, and ID cards. Its photo suitability isn't specified, so use it for photos only if its instructions allow that media.
For prints you don't want to feed, a flatbed gives you a different scanning method. For film originals, see flatbed scanners for negatives and slides.
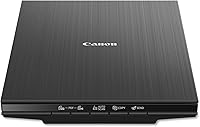
The Canon CanoScan LiDE 400 is a document and photo scanner with a flatbed design, auto scan mode, and image enhancements that include color restore and dust removal.
What should you check after scanning?
Inspect the digital files and the original prints before scanning the next batch. Look for skewed edges, missing borders, blur, color shifts, marks, or a scan that skipped a photo.
If a scan is crooked, check that the prints were aligned and that the feeder is clean before trying again. If a photo shows a new crease, scratch, or other damage, stop using the feeder for prints like it.
Save the files in at least one backed-up location. Epson says its FastFoto app can add voice or text to photos and create slideshows, and the scanner can upload to Dropbox and Google Drive.
When should you use a flatbed instead of an ADF?
Use a flatbed for fragile, valuable, or irregular prints that you don't want pulled through a feeder. It's also a practical choice when you need to scan a single photo and can place it carefully on the glass.
If you need a compact device for occasional scans, compare a best compact photo scanner with your print sizes and workflow. For large batches, a best photo scanner for multiple photos may be a better starting point.
If your goal is to get scans onto a phone, see how to scan photos to an iPhone. For a document workflow, how to use a Canon document scanner covers scanner setup and handling.
Which scanner approach fits your photo batch?
Choose an ADF photo scanner when you have many compatible, sturdy prints and want to feed them in groups. Choose a flatbed when prints are delicate, unusual in size, or better handled one at a time.
The Epson FastFoto FF-680W is the photo-focused option here, with batch feeding and a carrier sheet. The ES-50 is a single-sheet document scanner, while the CanoScan LiDE 400 is a flatbed model for document and photo scanning.
After scanning, decide how you'll share or print the files. Read which printer is better for printing photos and why inkjet is better for photo printing if you plan to make physical copies.
Frequently asked questions
Can you scan photos through an ADF?
Yes, if the scanner is designed for photos and the prints are in good condition. Check the maker's size and media guidance, remove any adhesive or loose debris, and use a carrier sheet when required.
Test one print first and inspect it before feeding a batch.
How many photos should you put in an ADF at once?
Follow the scanner's stated photo batch limit, and use fewer prints when sizes or conditions vary. For example, Epson says the FastFoto FF-680W can batch-scan up to 36 photos, but a smaller first batch helps you confirm alignment and handling.
Should you use a carrier sheet for old photos?
Use a carrier sheet when the scanner maker recommends one or when a print needs extra separation during feeding. A sheet can help guide a delicate photo, but it cannot make a cracked, curled, stuck, or flaking print safe for an ADF.
What should you do if an ADF photo scanner jams?
Stop the scan and follow the scanner's jam-clearing steps without pulling hard on the photo. Remove the remaining prints as directed, check for scraps or debris, and inspect every photo before trying again with a smaller, better-aligned batch.