How to Use Laminating Pouches Without a Machine
You can use laminating pouches without a machine only if you switch to self-seal or cold lamination, or use low heat carefully on suitable pouches. Regular thermal pouches need heat and pressure from a laminator for a seal you can trust, so cold options are the safest no-machine choice for most items.
On this page (10 sections)
- Can you use regular thermal laminating pouches without a machine?
- What are self-seal laminating pouches and how do they work?
- How does cold laminating film work without a machine?
- How can you laminate with a household iron in a pinch?
- Which no-machine option suits photos, documents, and classroom items?
- How do you get a smooth, bubble-free seal by hand?
- When should you buy a laminator instead of laminating by hand?
- Which products help you switch from hand lamination to machine lamination?
- How do you care for hand-laminated items so they last?
- What is the best way to use laminating pouches without a machine for your needs?
You can use laminating pouches without machine by choosing self-seal pouches or cold laminating film instead of standard thermal pouches. Self-seal sheets need only hand pressure, and cold film sticks to the surface without heat.
Thermal pouches are made to melt and seal under heat and rollers. Without that, they may not seal fully.
Cold and self-seal options use adhesive instead, so they work on a table with no power.
Can you use regular thermal laminating pouches without a machine?
No, regular thermal pouches are not designed for use without heat and pressure. They need a thermal laminator to melt the inner layer and press it flat around your item.
If you try them cold, the adhesive layer will not activate and the pouch can open at the edges. For a one-off page, self-seal sheets are simpler than trying to force a thermal pouch to work.
Our guide to what are laminating sheets breaks down the main types and when each one fits. Read it before you buy more supplies, because the wrong type is the most common reason no-machine lamination fails.
The Scotch Thermal Laminating Pouches in this post are 3 mil and sized 11 x 17 inches. That size suits large classroom or office items, but only when used with heat.
If you already own thermal pouches and have no machine, save them for use with a laminator. Trying to seal them with household heat is possible in a pinch, but it is not reliable for important documents.
What are self-seal laminating pouches and how do they work?
Self-seal pouches are two clear sheets with adhesive on the inside that you press together by hand. Place your item between them and smooth out air to create the seal.
No heat, rollers, or power are needed. They suit single sheets and small jobs such as certificates, menus, price signs, schedules, and children's artwork.
The seal is thinner than thermal lamination. It gives light to moderate protection and suits heat sensitive items, including photos and inkjet prints.
To use them, place the bottom sheet sticky side up on a clean flat surface. Center your item, lower the top sheet from one edge, and smooth with a ruler or card from the center outward.
Our roundup of best laminating pouches self seal compares size, thickness, and clarity. Check size before ordering, because a small pouch leaves edges exposed.
How does cold laminating film work without a machine?
Cold laminating film is a clear adhesive film you apply by hand to one side or both sides of an item. It protects without heat and gives a glossy or matte finish.
Trim excess with scissors after application. It suits stickers, labels, book covers, and single sided protection.
Because it is thin, it adds little stiffness. That flexibility helps stickers, but documents will not stay as rigid.
Our explainer on what is cold laminating film covers finish, thickness, and uses. To apply it, clean the surface, peel back a small section of backing, align the film, and press slowly while smoothing with a card.
Repositioning is hard once adhesive touches. For stickers, see best cold laminating sheets for stickers.
How can you laminate with a household iron in a pinch?
A household iron can melt a thermal pouch, but it carries real risks of wrinkles, bubbles, and damage. Use it only on heat tolerant items and test on a copy first.
Never try it first on photos or important originals, as heat can ruin the item.
Set the iron to its lowest synthetic setting with no steam. Place the pouch on a flat heat safe surface and cover it with a thin cotton cloth.
Keep the iron moving slowly and check edges often. Stop as soon as the pouch turns clear and seals, then let it cool flat under a heavy book.
It works best on sturdy card stock. It works poorly on thin paper, inkjet prints, and adhesive items, because heat can bleed ink or soften glue.
Which no-machine option suits photos, documents, and classroom items?
Match the method to the item. Use self-seal pouches for documents and classroom items, cold film for stickers and labels, and avoid heat for photos.
For classroom schedules, certificates, and signs, self-seal pouches add stiffness for repeated use. Scotch says its thermal pouches give a clear, photo-safe finish and are marker-proof, tear-proof, and spill-proof once sealed.
That description applies when sealed with heat, so a machine is still needed for that result.
For photos and inkjet prints, skip heat entirely. Cold film on one side often protects a framed or album photo, while a self-seal pouch protects both sides if the photo will be handled often.
For stickers, cold film stays flexible and follows curves. For outdoor signs, self-seal pouches resist rain and touch better than one layer of film.
How do you get a smooth, bubble-free seal by hand?
Bubbles come from trapped air, dust, and uneven pressure. Work on a clean flat surface, smooth from the center outward, and check edges before you finish.
A ruler or old card works as a simple squeegee. Start with clean dry hands and wipe dust off the item with a dry cloth.
Place the item on the bottom sheet, then lower the top sheet from one short edge so air escapes ahead of the seal line. Smooth in small strokes toward the edges.
If a bubble appears, lift the top sheet just enough to release it, then press down again. Do not stretch the plastic, because wrinkles cannot be removed.
Leave a small margin when trimming, since cutting too close can break the seal and let moisture in. Let the item rest flat while adhesive sets, and press any lifted edge down with a second pass of the card.
When should you buy a laminator instead of laminating by hand?
Buy a laminator when you laminate often, in batches, or need a thicker seal. Hand methods suit a few pages, but take more time per page and give a thinner seal.
A machine gives even heat and pressure every time. It also pays off for a classroom, office, or small business, where a consistent finish looks more professional on certificates and signs.
Our guide, laminators: the complete buying guide, explains pouch thickness, width, and warm-up time. Use it to match a machine to your largest item.
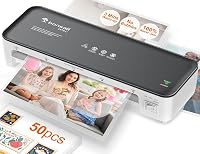
The Fellowes FEL5738201 is a home or home office laminator for 3 and 5 mil hot pouches and self-adhesive cold pouches. Fellowes says it takes documents up to 9.5 inches wide and heats in four minutes.
It includes a starter kit with ten 3 mil letter-sized pouches.
If you want step-by-step help with a specific brand, our guide to how to use the fellowes laminating machine walks through warm-up, pouch choice, and feeding.
Which products help you switch from hand lamination to machine lamination?
The two laminators below show the step up from hand methods. Pick based on width, pouch thickness, and how often you laminate.
Both pair with the thermal pouches you may already own.
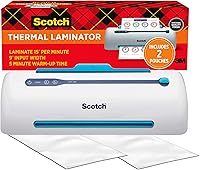
The Scotch PRO TL906 thermal laminator machine accepts pouches up to 9 inches wide and works with 3 mil and 5 mil pouches. Scotch says it warms up in five to six minutes and laminates at 15 inches per minute.
It has two heated rollers and two temperature settings, and it includes two 8.5 x 11 inch thermal pouches.
Choose the Fellowes if you want flexibility between hot and cold pouches in one machine. Choose the Scotch PRO if you want a smaller footprint and a faster feed rate for classroom or office use.
Both are aimed at home, home office, and school settings.
Our roundup of best fellowes laminator machine options helps if you prefer that brand. Our guide to best cold roll laminator covers hand-cranked cold options if you want to stay machine-free but need wider coverage.
How do you care for hand-laminated items so they last?
Hand-laminated items last longer with simple care. Keep them flat, dry, and away from direct heat and long sun.
Heat and moisture are the weak points of adhesive seals. Store finished items in a folder or sleeve instead of stacking them loosely.
Avoid a hot car or window, because heat can soften adhesive and cause bubbles later. Clean them with a soft dry cloth.
Scotch notes its thermal pouches are safe with most household cleaners. It advises testing a small amount in a corner first, especially on important documents.
Use mild cleaning only and never use acetone on plastic. Check edges every few months for lifting, and press a lifted edge back down with a card while flat.
Replace items when they yellow, curl, or peel. For daily items such as schedules and signs, thermal lamination holds up better.
What is the best way to use laminating pouches without a machine for your needs?
For most readers, self-seal pouches are the best way to use laminating pouches without machine for documents, and cold film is best for stickers. Both avoid heat and cost less than a machine.
Pick self-seal pouches for stiffness and protection on both sides. Pick cold film for a thin flexible layer for stickers, labels, or photos.
Skip the iron method unless you have heat safe card stock and a copy to test on. If you laminate more than a few pages a month, a thermal laminator saves time and gives a thicker seal.
The Scotch 11 x 17 inch 3 mil pack in this post is made for that step up. Pair thermal pouches with a machine sized to your largest item, and check size before you buy.
Frequently asked questions
Can you laminate thermal pouches with an iron?
You can try low heat with a cloth barrier, but results vary and heat-sensitive items can be damaged. Test a corner first, use the lowest setting, keep the iron moving, and stop if the pouch wrinkles or melts.
Self-seal sheets give a more predictable result without heat.
Do self-seal laminating pouches need a machine?
No. Self-seal pouches use a pressure-sensitive adhesive that bonds when you press the sheets together.
Smooth from the center outward, check the edges, and let the bond set before use.
They work well for single pages and small batches.
What is the difference between cold lamination and self-seal pouches?
Cold lamination uses a film with adhesive backing that you apply to one side or both sides of an item. Self-seal pouches are two sheets sealed around the item.
Cold film is often thinner and better for stickers, while pouches add stiffness and edge protection.
Can you laminate without a machine for school or office documents?
Yes, for light use. Self-seal and cold film suit certificates, schedules, signs, and children's artwork.
For frequent handling or large batches, a thermal laminator gives a thicker, more even seal and costs less per page over time.