How to Use a Swingline GBC Laminator
To use a Swingline GBC laminator, set the heat for your pouch thickness, wait for the ready light, load the pouch sealed edge first, and feed it straight through. Let the sheet cool flat before you handle it.
On this page (10 sections)
- How to use a Swingline GBC laminator step by step
- What do you need before you start laminating?
- How do you load a pouch correctly?
- Which heat setting should you choose?
- How long should you wait for warm-up?
- How fast should you feed the pouch?
- What causes jams and cloudy finishes?
- Which 9 inch laminator fits your desk?
- How do you care for a pouch laminator?
- How to use a Swingline GBC laminator without common mistakes
To use a Swingline GBC laminator, set the heat for your pouch thickness, wait for the ready light, load the pouch sealed edge first, and feed it straight through. Let the sheet cool flat before you handle it.
That short sequence covers most of how to use a Swingline GBC laminator safely. The details below explain pouch loading, heat settings, warm-up, feeding speed, and jam release.
How to use a Swingline GBC laminator step by step
Turn it on, choose 3 mil or 5 mil, wait for ready, then feed the sealed edge first. Keep the pouch centered so one side does not catch the roller edge.
Start on a flat desk with the cord routed away from the feed path. Place the document in the pouch and smooth out wrinkles before the pouch reaches the rollers.
Most Swingline GBC pouch models use a simple light to show when they are ready. Feeding early is the most common cause of a weak seal, so wait for that signal every time.
Once the pouch enters, let the rollers pull it through at their own pace. Do not push, pull, or twist the sheet while it is inside.
What do you need before you start laminating?
You need the laminator, the correct pouch, and a clean document. Check that the pouch thickness matches a heat setting on the machine.
Pouch laminators seal a document inside a plastic pouch, so the pouch is a supply you will keep buying. A 9 inch machine accepts letter and legal sheets up to 9 inches wide, plus smaller items like photos and cards.
Read the manual for your exact model before first use. Button placement, light color, and jam release style differ between models and brands.
Our laminator machine for paper guide explains pouch types and sizes in more depth.
How do you load a pouch correctly?
Place the document inside the pouch, align it evenly, and feed the sealed edge first. The sealed edge is the closed side with no opening.
Leave a small margin around the document so the plastic can seal on every side. If the document touches the pouch edge, the seal can be thin or open later.
Slide the pouch into the feed slot straight, not at an angle. A crooked entry can cause the pouch to fold, wrinkle, or jam against one roller.
Keep your fingers clear of the slot once the rollers grip the pouch. The machine will move the pouch through on its own.
How to use a Swingline GBC laminator for photos and cards
Center small items and leave extra margin on all sides. Photos and cards shift easily inside a pouch.
For a photo, place it face up and check each corner before feeding. For a card, turn it so its long side runs with the feed direction.
Thicker items need a pouch they can flex inside without buckling. If a card bends the pouch as it enters, stop and choose a thicker pouch or a lighter item.
Which heat setting should you choose?
Use 3 mil for normal documents and photos, and 5 mil for thinner papers that need a stiffer finish. The setting must match the pouch in use.
Mil refers to thickness, so 5 mil film is thicker and gives a stiffer result. A mismatch can leave the seal incomplete or make the pouch bubble.
Set the heat before the machine warms up, then wait for the ready light. Changing the setting mid-job means waiting again until the rollers reach the new temperature.
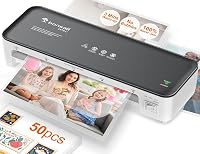
The Amazon Basics 9-Inch Thermal Laminator Machine has two heat settings. It uses 3 mil for normal documents, photos, and card stock, and 5 mil for thinner papers.
At the 3 mil position, the paper thickness range is 50 to 160 g, while at the 5 mil position it is 50 to 100 g.
How long should you wait for warm-up?
Wait for the ready indicator light before you feed any pouch. Most thermal machines in this class need about 3 to 6 minutes.
Warm-up time is not a step to skip to save time. A pouch fed into cold rollers may emerge cloudy, wrinkled, or sealed only on part of the sheet.
Use the waiting time to load the next few pouches. That keeps a batch moving without rushing the machine.
If you plan a large classroom or office batch, warm-up matters for scheduling. Desktop laminators how to use covers batch planning for desk models.
The Scotch PRO TL906 thermal laminator machine warms up in 5 to 6 minutes. It laminates at a rate of 15 inches per minute, which suits steady small batches.
It accepts both 3 mil and 5 mil pouches up to 9 inches wide. Two heated rollers and two temperature settings create the finished surface for documents and photos.
How fast should you feed the pouch?
Let the rollers feed the pouch at their own speed and do not pull it out early. Speed is set by the machine, not by your hand.
Pulling the sheet can stretch the film and break the seal at the back edge. Pushing it in too fast can cause the pouch to buckle at the entry slot.
Support the sheet as it exits so it does not curl or hit the desk edge. Lay the finished sheet flat to cool for a minute or two.
What causes jams and cloudy finishes?
Most jams come from a wrong heat setting, a crooked pouch, or an item that is too thick. Most cloudy finishes come from feeding before the machine is ready.
A pouch that is too thick for the setting may not seal fully. A document that is too thick for the pouch can also fold inside and catch on a roller.
Check the pouch thickness against the setting before every batch. If you switch pouch types, reset the heat and wait for the light again.
Keep the entry area clean and free of loose paper scraps. Small bits of paper near the slot can be pulled in with the next pouch.
How do you use the jam release lever?
Stop feeding, use the jam release lever, and pull the pouch out gently in the direction it entered. Do not force a stuck pouch.
A jam release lever lifts or separates the rollers so you can remove the pouch with less stress. Pull slowly and evenly, keeping the pouch flat as it comes free.
After a jam, let the machine cool briefly and check for leftover film inside the slot. Running another pouch through residue can cause another jam.
Our gbc pouch laminator reviews compare how different GBC models handle pouch entry and jam clearing.
Which 9 inch laminator fits your desk?
Choose by pouch size, heat settings, warm-up time, and how you will clear a jam. A 9 inch width covers letter and legal paper.
Measure the desk space before you buy, because machines differ in length. The Amazon Basics model measures about 13.9 x 2.6 x 4.4 inches, while the Scotch PRO TL906 measures 15.8 x 4 x 4 inches.
Weight also matters if you store the machine in a cabinet. The Amazon Basics machine weighs 2.5 pounds compared with 3.2 pounds for the Scotch model.
Both machines use two rollers and two heat settings. The Amazon Basics model adds a jam release lever, while the Scotch model adds a foldable input tray and hidden cord storage.
If you want a broader shortlist, the best 9 inch laminator guide compares more models in this size.
How do you care for a pouch laminator?
Keep the slot clean, store it as directed, and let it cool before you put it away. Basic care prevents most repeat problems.
Wipe the outside with a dry cloth and check the feed slot for paper bits or film residue. Do not use water inside the machine.
Store the laminator where the rollers will not be pressed flat by heavy items. Wrap the cord loosely and use any built-in cord storage if your model has it.
If you trim items often, a clean cut helps the pouch seal evenly. Our guide to best paper cutter replacement blades can help if your current cutter leaves rough edges.
For a different brand workflow, scotch tl902 thermal laminator how to use walks through a similar thermal process.
How to use a Swingline GBC laminator without common mistakes
Match the heat to the pouch, wait for ready, feed sealed edge first, and let the sheet cool flat. Those four habits prevent most poor results.
Avoid feeding before the light, forcing a thick item, or pulling the pouch out early. Each shortcut can leave a cloudy finish or a jam.
Plan batches by pouch type so you do not switch settings between sheets. Group all 3 mil items together, then all 5 mil items, with a warm-up wait between groups.
Keep a few spare pouches ready before you start. That way you are not feeding in a rush.
Pick the Amazon Basics model if a jam release lever and a shorter body matter most. Pick the Scotch PRO TL906 if a foldable input tray and cord storage matter more.
Frequently asked questions
How do I load a pouch in a Swingline GBC laminator?
Open the pouch and place the document inside, leaving a small even margin on all sides. Insert the sealed edge first so the rollers pull the pouch in straight, with the open edge trailing behind.
Should I use 3 mil or 5 mil pouches?
Use 3 mil for normal documents, photos, and card stock that you want to stay flexible. Use 5 mil for thinner papers or items that need a stiffer, more protective finish, and set the machine to match the pouch.
How long does a pouch laminator take to warm up?
Most 9 inch thermal models in this guide warm up in about 3 to 6 minutes. Wait for the ready indicator light before feeding a pouch, because a cold machine can leave a cloudy or poorly sealed finish.
What should I do if a pouch jams?
Stop feeding and switch the machine off if it has a switch. Use the jam release lever where fitted, pull the pouch out gently in the direction it entered, and let the rollers cool before you try again.