How to Replace a Xerox B230 Imaging Unit
To replace a Xerox B230 imaging unit, power down the printer, remove the toner and drum assembly, install the correct replacement, and reseat it firmly. Reset or clear the related message only after the hardware is fully installed.
On this page (9 sections)
- What is a Xerox B230 imaging unit?
- How do you replace the Xerox B230 imaging unit?
- How do you remove the old imaging assembly safely?
- How do you reinstall the Xerox B230 imaging unit?
- What should you do if the imaging-unit message remains?
- How should you test the printer after replacement?
- Which drum-unit lessons apply to this repair?
- How can you avoid imaging-unit problems?
- What is the right next step for a Xerox B230 imaging-unit error?
To replace a Xerox B230 imaging unit, turn off the printer, remove the toner and imaging assembly, fit the correct replacement, and reseat it completely. Then close the covers, reconnect power, and follow the printer's reset instructions if the message remains.
The Xerox B230 uses separate laser-printing components, so confirm whether the warning refers to the imaging unit, toner cartridge, or another part. A toner replacement won't correct an imaging-unit message when the drum or imaging hardware is the issue.
What is a Xerox B230 imaging unit?
A Xerox B230 imaging unit is the part of the laser-printing system that helps transfer the image to paper. It works with toner, but it isn't the same component as the toner cartridge.
If you want the basic parts explained first, read What Is a Printer Imaging Unit? A Friendly Guide.
Understanding the difference helps you avoid replacing toner when the printer is asking for imaging hardware.
A worn imaging unit may be associated with repeated marks, faded areas, streaks, or a printer message. These symptoms can also come from toner, paper, contamination, or other printer parts, so inspect the machine before ordering anything.
How do you replace the Xerox B230 imaging unit?
Replace the Xerox B230 imaging unit in this order: power down, open, remove, compare, install, reseat, and test. Use the printer's manual for the exact access points and reset steps.
- Finish or cancel any active print job.
- Turn the Xerox B230 off using its power control.
- Unplug the power cord and allow the printer to stop moving.
- Open the front or top access area specified for the toner and imaging assembly.
- Remove the toner cartridge and imaging assembly carefully.
- Compare the replacement part with the old assembly before installation.
- Insert the new imaging unit in the same direction and position.
- Reinstall the toner cartridge if it was removed separately.
- Close every cover until it is fully shut.
- Reconnect power and turn the printer on.
- Print a test page and check whether the warning has cleared.
Don't force the assembly into place. If it stops before reaching its normal position, remove it and check for packing material, a displaced guide, or an obstruction.
What should you check before ordering?
Check the Xerox B230 model, the exact part number, and the printer's message before ordering. A drum unit made for another printer can look similar but still be incompatible.
Check the old unit's label and compare its shape, connectors, guides, and toner interface with the replacement. Keep the old part nearby until the new one is installed and working.
Also check whether the problem is actually toner. If prints are clean and the printer only shows a low-toner message, an imaging-unit replacement may not be the right repair.
How do you remove the old imaging assembly safely?
Remove the old imaging assembly by its intended handles or grip areas, keeping the surface protected from bright light and contamination. Avoid touching the imaging surface with your fingers.
Place the removed assembly on a clean, level surface. Keep it away from loose toner, liquids, direct sunlight, and objects that could scratch the drum surface.
Don't shake the assembly or use household cleaners on it. If toner spills, follow the printer manufacturer's cleaning instructions instead of rubbing the imaging surface.
How do you reinstall the Xerox B230 imaging unit?
Guide the replacement straight into its tracks and press it into its seated position without twisting. The assembly should sit evenly and allow the cover to close normally.
Check that the toner cartridge is positioned correctly on the imaging unit if the design uses a combined removable assembly. Make sure no shipping lock, protective strip, or packaging remains attached.
Close the printer slowly. If a cover catches, stop and inspect the assembly instead of applying extra pressure.
Can a drum unit help you understand the replacement?
A drum unit is the same general type of laser-printing component as an imaging drum, but compatibility is model-specific. The best printer drum unit guide explains how yield, printer fit, and genuine replacement choices affect the decision.
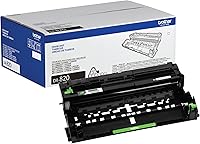
The Brother Genuine-Drum Unit is a Brother DR820 drum unit with a stated yield of up to 30,000 pages. It is for listed Brother mono laser printers and all-in-ones, not the Xerox B230.
Its title identifies the DR820 model, black color, Brother brand, and approximate page yield. Those details are useful examples of the information to compare, but they don't make it suitable for a Xerox printer.
What should you do if the imaging-unit message remains?
If the Xerox B230 still shows an imaging-unit message, power it down and reseat the assembly before trying the reset procedure. A loose installation can prevent the printer from recognizing the part.
Check these points:
- The imaging unit is fully inserted.
- The toner cartridge is seated correctly.
- All covers are closed.
- Protective packaging has been removed.
- No paper or loose toner blocks the assembly.
- The replacement matches the Xerox B230.
If the message returns after reseating, use Xerox's instructions for that exact error. Don't keep resetting the counter without checking the hardware, because a reset doesn't repair an incorrect or damaged part.
How should you test the printer after replacement?
Print a test page after the Xerox B230 recognizes the new imaging unit. Look for repeated marks, light bands, dark streaks, missing areas, and toner that does not appear evenly on the page.
Print several pages if the first sheet looks acceptable but the original problem was intermittent. Keep the paper type and print settings consistent while checking the result.
If defects repeat at regular intervals, the imaging surface may still be affected. If defects appear randomly, check toner seating, paper condition, and the printer's cleaning instructions.
For background on how laser printers create pages, see Laser Printer Imaging Process: A Clear Explanation. It can help you separate imaging problems from toner and paper problems.
Which drum-unit lessons apply to this repair?
The main lesson is to match the imaging part to the exact printer model, not just to the general printer type. Page yield, brand, model number, and whether toner is included all matter.
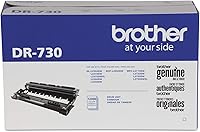
The Brother Genuine DR730 Drum Unit is a Brother DR730 drum unit with a stated yield of up to 12,000 pages. It is for listed Brother mono laser printers and all-in-ones, and it does not contain toner.
The best brother dcp l2640dw drum guide can help if you are replacing a drum in that Brother printer family. It should not be used as a compatibility guide for the Xerox B230.
The Brother Printer DR431CL Drum Unit-Retail Packaging is identified as a DR431CL imaging drum. Its data includes a white color description, automatic duplex, a 600 x 600 dpi maximum black-and-white print resolution, and a maximum media size of A4/Letter.
This part is also not a Xerox B230 replacement. For Brother-specific comparisons, see best brother laser printer drum.
How can you avoid imaging-unit problems?
Reduce avoidable problems by using the correct part, keeping the printer clean, and handling the imaging assembly carefully. Follow the Xerox B230 manual for cleaning, storage, and replacement intervals.
Keep the printer on a stable surface and use suitable paper. Remove paper dust and loose toner only with methods approved for the printer.
Don't touch the imaging surface, expose it to strong light for long periods, or store it where moisture can reach the assembly. Keep replacement parts in their protective packaging until you are ready to install them.
A laser printer can serve different printing needs than an inkjet model. If you are comparing printer types, Can a Laser Printer Replace an Inkjet Printer? covers the main trade-offs.
What is the right next step for a Xerox B230 imaging-unit error?
For a Xerox B230 replace imaging unit task, first confirm the exact warning and part number, then reseat or replace the correct imaging assembly. Test the printer before deciding that another component needs attention.
Choose a Xerox-specific replacement when the imaging unit is worn or damaged. Use Brother drum guides only for Brother models, since the DR820, DR730, and DR431CL examples above are not compatible with the Xerox B230.
Frequently asked questions
How do you replace a Xerox B230 imaging unit?
Turn off and unplug the Xerox B230, open the printer, remove the toner and imaging assembly, and install the correct replacement in the same position. Reseat the assembly fully, close the printer, reconnect power, and follow the printer's reset instructions if an imaging-unit message remains.
Is the Xerox B230 imaging unit the same as toner?
No. The imaging unit and toner cartridge are separate parts of a laser printing system.
Toner holds the printing material, while the imaging hardware transfers the image during printing.
Check the part number and printer instructions before replacing either component.
Why does the Xerox B230 still show an imaging-unit error?
An error can remain when the assembly is not fully seated, a cover is not closed, the wrong replacement is installed, or the printer needs its imaging-unit reset procedure. Power the printer down, reseat the assembly, inspect for packaging, and use Xerox's instructions for the exact message.
Can Brother drum units replace a Xerox B230 imaging unit?
No. Brother drum units are made for listed Brother printers and are not Xerox B230 replacements.
The Brother examples below are useful for understanding drum-unit selection and care, but you need a part specifically identified for the Xerox B230.