What Is a Cold Press Laminator?
A cold press laminator is a machine that seals paper with pressure from rollers, not heat. It presses pressure-sensitive film or self-sealing pouches onto a sheet, so heat-sensitive ink, stickers, and labels stay safe.
On this page (11 sections)
- How does a cold press laminator work?
- What materials can you laminate without heat?
- Cold press laminator vs thermal laminator: which is better?
- What is a cold press laminator used for in schools and offices?
- How do you get a bubble-free finish with cold lamination?
- Which products help you practice cold lamination?
- How do you choose between roll film and self-sealing pouches?
- When should you pick heat instead of cold?
- How do you clean and care for a cold press laminator?
- Why is there a cold setting on a laminator?
- Which cold press laminator setup fits your needs?
A cold press laminator is a machine that seals paper with pressure from rollers, not heat. It presses pressure-sensitive film or self-sealing pouches onto a sheet, so heat-sensitive ink, stickers, and labels stay safe.
You will see this style in classrooms, craft rooms, and small offices. It has no warm-up wait, no heat setting, and no hot rollers to cool down.
That makes it simple for quick jobs, though the seal and thickness differ from thermal pouches.
How does a cold press laminator work?
A cold press laminator works by squeezing an adhesive film against paper between rollers. The pressure activates the adhesive and pushes out most air as the sheet moves through.
Most models use one or two rollers. Wider rollers spread pressure more evenly, which helps reduce bubbles at the edges.
You still need to feed the sheet straight, because a crooked start can lock in a wrinkle.
The film itself does the bonding. Cold film has a pressure-sensitive adhesive that sticks when pressed, not when heated.
That is why the same machine can run all day with no temperature changes.
If you want the full buying context first, our guide to a laminator machine for paper compares hot, cold, and hybrid styles in one place.
What materials can you laminate without heat?
Cold lamination works best with pressure-sensitive film, self-sealing pouches, stickers, and labels. Smooth paper, photos, and placards also bond well when the surface is clean and flat.
Heat-sensitive ink is a key reason to choose cold. Some inkjet prints, thermal receipts, and certain markers can smear or fade under heat.
Cold pressure avoids that risk, though you should still test a corner on important items.
Texture matters. Glossy paper bonds smoothly, while rough or fibrous paper can trap air.
Thick cardstock may pass through some rollers but peel later if the adhesive cannot grip the surface.
For film details, read what is cold laminating film before you buy a roll or pouch pack.
Cold press laminator vs thermal laminator: which is better?
The main difference is heat versus pressure, and the seal each one creates. Thermal machines melt a pouch layer to bond it, while cold machines press adhesive film onto the sheet.
Thermal pouches often feel thicker and more rigid after sealing. That helps menus, certificates, and teaching aids that get handled daily.
Cold film is usually thinner, which suits stickers and labels that need to stay flexible.
Speed works differently too. Cold machines start right away, while thermal machines need warm-up time.
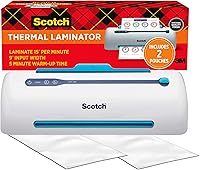
The Scotch PRO TL906 thermal laminator machine warms up in five to six minutes and runs at 15 in. per minute, according to Scotch.
A Fellowes FEL5738201 is listed as compatible with 3- and 5-mil hot pouches as well as self-adhesive cold pouches. That mix is useful if most jobs need heat but some items cannot take it.
If cold is your main need, check the best cold laminator for stickers for machines built around pressure film.
What is a cold press laminator used for in schools and offices?
A cold press laminator is often used for stickers, labels, signs, and items that heat can ruin. Teachers and office staff also use it for name tags, shelf labels, and small display cards.
Classroom use is a good fit because there is no warm-up clock. You can seal a label set between lessons without waiting for rollers to heat.
The thin finish also keeps stickers flexible enough for laptops, bins, and folders.
Offices use cold film for posted notices that include thermal printouts or laser labels. Heat can curl some label stock, while pressure keeps the sheet flatter.
Test the label stock first, since adhesive layers can vary.
If you laminate in batches, as many teachers do, look first at the widest sheet it takes and how smoothly it feeds one sheet after another.
How do you get a bubble-free finish with cold lamination?
A bubble-free finish comes from clean, flat, straight feeding and firm, even pressure. Most bubbles trace back to dust, a bent corner, or a sheet that entered at an angle.
Wipe the sheet and the work surface before you start. Even a small fiber can lift the film and trap air under it.
Keep the film liner in place until the leading edge is inside the rollers.
Feed the sheet straight and let the rollers pull it through. Do not speed it up by hand, and do not stop halfway to smooth the film.
That pause can create a visible line or a trapped pocket of air.
Step by step: cold lamination without bubbles
Start with a clean sheet, a clean surface, and film cut to size. Peel the liner back only a short distance at the leading edge, then align the film while you feed.
Guide the sheet with both hands if your model allows it. Keep light, steady tension on the trailing edge until the sheet exits.
If the edge curls, flatten it before the next pass and check for dust.
If bubbles appear, do not re-run the sheet hoping heat will fix them. Cold film has no heat to reflow, so a second pass rarely removes air.
Cut the sheet down or restart with fresh film.
Which products help you practice cold lamination?
Practice products help when you want to test film, pouches, and roller pressure before a big job. Start with small sheets so a mistake costs little.
The Scotch Thermal Laminating Pouches in 11 x 17 in size, 25 pack, 3 mil, show what a thermal pouch feels like next to a thin cold film. They are listed for signs, flyers, schedules, certificates, and children's artwork.
That larger size is useful for posters and banners, but it will not fit every small cold machine. Measure your entry width first, then match the pouch or film to the machine.
Self-sealing sheets are another practice option. Our best self sealing laminating sheets guide explains how those sheets differ from roll film and thermal pouches.
How do you choose between roll film and self-sealing pouches?
Roll film suits long sheets, stickers, and custom sizes, while self-sealing pouches suit single sheets you want to finish fast. Your choice affects waste, speed, and how easy trimming feels.
Roll film lets you cut exact lengths and cover items wider than a standard pouch. You do need to align the film, manage the liner, and trim the edges after sealing.
Self-sealing pouches are simpler. You place the sheet inside, peel and press the adhesive side down, and smooth out air by hand.
Many need no machine at all, which helps for one-off labels.
Think about volume. If you laminate one label sheet a week, pouches may be enough.
If you run craft stickers daily, roll film will save time.
When should you pick heat instead of cold?
Pick heat when you want a thicker, more rigid seal for items handled every day. Menus, lesson cards, certificates, and posted schedules often benefit from that stiffness.
Thermal pouches also seal around the edges in a way that resists peeling. Cold film can lift at corners if the paper is thick, dusty, or textured.
That matters for items that live in binders or get wiped clean often.
Pick cold when the item itself is the limit. Thermal receipts, some inkjet prints, vinyl stickers, and heat-sensitive labels can warp, fade, or melt under hot rollers.
Pressure avoids those risks.
For the heat side of that choice, what are laminating sheets covers pouch sizes, thickness, and how to load them.
How do you clean and care for a cold press laminator?
Care for a cold press laminator with dry cleaning, gentle roller checks, and storage away from dust. No heat means less residue risk, but adhesive film can still leave buildup.
Wipe the rollers with a soft, dry cloth after sticky jobs. Do not use sharp tools or solvents unless the maker allows them.
Some liquids can swell rubber rollers.
Store the machine with the rollers open if your model has a release lever. That reduces pressure marks during long storage.
Keep film rolls upright and away from heat, since warm storage can soften adhesive.
Cut film on a clean mat and keep the liner side clean. Dust on the adhesive will show after sealing, and cold film cannot be reheated to hide it.
Why is there a cold setting on a laminator?
Many laminators include a cold setting because some pouches and films need pressure only, not heat. That setting lets one machine handle both thermal pouches and self-adhesive cold pouches.
The Fellowes FEL5738201 shows that overlap clearly. It is compatible with 3- and 5-mil hot pouches as well as self-adhesive cold pouches, according to Fellowes.
A cold setting is not the same as a dedicated cold press laminator. A hybrid machine may still need you to switch modes, release rollers, or follow extra steps.
A dedicated cold machine is built around pressure film from the start.
To understand the mode switch, read why is there a cold setting on a laminator before your first cold pouch run.
Which cold press laminator setup fits your needs?
For a cold press laminator, match the film type to the item first, then pick the machine width. Stickers and labels need flexible, thin film, while signs need wider coverage and firmer edges.
If you mostly laminate small craft items, a compact cold unit with a clear entry guide will serve you well. If you run mixed sizes, a wider throat and adjustable rollers reduce jams and crooked feeds.
If you need both modes, a hybrid like the Fellowes FEL5738201 covers 3- and 5-mil hot pouches plus self-adhesive cold pouches. If heat is your main job, the Scotch PRO TL906 handles up to 9 in. wide.
Start with a test sheet and check the seal after an hour. Adjust your film choice before you run a full class set or office batch.
Frequently asked questions
What is a cold press laminator?
A cold press laminator seals film or pouches with pressure from rollers. It uses no heat, so it suits stickers, labels, photos, and inks that heat can damage.
You feed the sheet through, and the rollers press the adhesive layer into place.
Can a thermal laminator do cold lamination?
Some thermal machines accept self-adhesive cold pouches if the maker allows it. Check the manual for cold pouch use, roller release, and cleaning steps.
Never force a pouch through a machine that requires heat for every pass.
What materials work best with cold lamination?
Pressure-sensitive film, self-sealing pouches, label stock, and sticker sheets work best. Smooth paper and cardstock bond most evenly.
Very thick, textured, or warped sheets may trap bubbles or peel at the edges.
Is cold lamination better than thermal lamination?
Cold lamination is better for heat-sensitive items and fast, no-warm-up jobs. Thermal lamination often gives a thicker, more rigid seal for daily handled documents.
The right choice depends on the item, not on which finish looks better in a photo.